A Developer Gateway To IT World...

Techie Uncle Software Testing Core Java Java Spring C Programming Operating System HTML 5 Java 8 ES6 Project

Portability Testing

Portability Testing

Portability Testing

Portability testing ensures that software can be easily transferred and run across different environments, platforms, and configurations.

What is Portability Testing?

Portability testing is a type of software testing that focuses on evaluating how well software can operate across different environments, hardware, operating systems, and devices. This ensures that the software remains functional and provides a consistent user experience, regardless of the platform on which it is deployed.

Objectives of Portability Testing

  • Ensure that the software can be transferred between different operating systems (e.g., from Windows to Linux).

  • Test the software's ability to run on different hardware configurations (e.g., desktop, mobile, tablets).

  • Verify the software works across different browsers, ensuring consistent functionality.

  • Identify any environmental issues that could affect the software's operation in different platforms.

Benefits of Portability Testing

By performing portability testing, organizations can:

  • Improve software flexibility by ensuring it works across multiple platforms.

  • Reduce the need for platform-specific versions or modifications, saving development time and cost.

  • Enhance user experience by providing consistent software behavior on different devices and systems.

  • Increase software accessibility and availability across diverse environments.


Compatibility Testing

Compatibility Testing

Compatibility Testing

Compatibility testing ensures that software performs as expected across different platforms, environments, and configurations.

What is Compatibility Testing?

Compatibility testing is a type of non-functional testing that checks whether a software application is compatible with the operating system, browser, hardware, and network configurations it is intended to run on. It ensures that the application provides a consistent user experience across different environments.

Types of Compatibility Testing

  • Browser Compatibility Testing:

    Ensures the application works across various web browsers (e.g., Chrome, Firefox, Safari, etc.).

  • Operating System Compatibility Testing:

    Verifies the application runs smoothly on different operating systems (e.g., Windows, macOS, Linux).

  • Mobile Compatibility Testing:

    Ensures the application functions properly on different mobile devices (e.g., Android, iOS) and screen sizes.

  • Hardware Compatibility Testing:

    Checks that the software is compatible with various hardware configurations, such as printers, scanners, and peripheral devices.

  • Network Compatibility Testing:

    Ensures the software works under different network conditions, such as varying bandwidth and latency.

Benefits of Compatibility Testing

By conducting compatibility testing, organizations can:

  • Ensure consistent user experience across different devices, browsers, and operating systems.

  • Increase user satisfaction by ensuring the application works as expected on a variety of environments.

  • Identify compatibility issues early in the development process to avoid costly fixes later.

  • Improve software reliability by ensuring it operates well in different network and hardware environments.


Security Testing

Security Testing

Security Testing

Security testing is essential for ensuring that software systems are protected from threats and vulnerabilities.

What is Security Testing?

Security testing is a process to identify and fix vulnerabilities in a system, ensuring the safety and integrity of data. It includes evaluating and validating the security aspects of software applications, networks, and systems.

Types of Security Testing

  • Vulnerability Scanning: Identifying and scanning systems for known vulnerabilities.

  • Penetration Testing: Simulating attacks to evaluate the effectiveness of the security mechanisms.

  • Risk Assessment: Evaluating potential risks and vulnerabilities that could be exploited.

  • Security Audits: Reviewing the system’s code, configurations, and security measures to ensure compliance.

Benefits of Security Testing

By conducting security testing, organizations can:

  • Detect vulnerabilities before they can be exploited by malicious actors.

  • Protect sensitive data and prevent data breaches.

  • Ensure compliance with security standards and regulations.

  • Build trust with users by ensuring a secure environment.


Reliability Testing

What is Reliability Testing?

Reliability Testing

Reliability testing is a type of software testing that ensures a system or application performs consistently under specified conditions over a defined period of time.

The main objective of reliability testing is to identify and rectify issues that could lead to system failures, ensuring the software meets the required reliability standards before release.

This testing involves simulating real-world scenarios and usage to evaluate how well the system can sustain its performance without errors or interruptions.

Key benefits of reliability testing include improved user satisfaction, enhanced system stability, and reduced maintenance costs over the software's lifecycle.

Reliability testing is a type of software testing that ensures a system performs its intended functions under specified conditions without failure for a specified period of time. It focuses on measuring the system's ability to operate consistently and dependably.

Objectives of Reliability Testing

The primary goals of reliability testing include:

  • To identify and fix issues that may affect the system's reliability.

  • To ensure the software meets reliability requirements.

  • To predict the reliability of a system over time.

Types of Reliability Testing

There are various types of reliability testing used to ensure software performance under different conditions:

  1. Feature Testing: Verifies that specific features perform reliably under various conditions.

  2. Load Testing: Checks system reliability under expected and peak load conditions.

  3. Stress Testing: Assesses the system's ability to handle extreme conditions.

  4. Failure Testing: Evaluates system behavior when it encounters faults or errors.

Benefits of Reliability Testing

By conducting reliability testing, organizations can:

  • Improve customer satisfaction by delivering dependable software.

  • Reduce downtime and maintenance costs.

  • Enhance system performance and operational consistency.

Spring Boot Runners

Understanding Spring Boot's Runner Classes

Understanding Spring Boot's Runner Classes

In Spring Boot, there are two critical interfaces: Application Runner and Command-Line Runner. These interfaces play a pivotal role in executing code once a Spring Boot application starts. Let's delve into these interfaces and how to implement them.

What is Application Runner?

The Application Runner interface is used to execute code after a Spring Boot application has started.


                package com.techieuncle.app;

                import org.springframework.boot.ApplicationArguments;
                import org.springframework.boot.ApplicationRunner;
                import org.springframework.boot.SpringApplication;
                import org.springframework.boot.autoconfigure.SpringBootApplication;

                @SpringBootApplication
                public class ExampleApplication implements ApplicationRunner {
                   public static void main(String[] args) {
                      SpringApplication.run(ExampleApplication .class, args);
                   }
                   @Override
                   public void run(ApplicationArguments arg0) throws Exception {
                      System.out.println("Let's Print Hello World in Application Runner");
                   }
                }


What is the Command Line Runner in Spring Boot?

In Spring Boot, the Command Line Runner is an interface that allows developers to create components that run specific code when a Spring Boot application starts up. It is part of the Spring Framework's support for bootstrapping and initializing an application.

Here's how it works:

1. **Implementing the CommandLineRunner Interface:**
To use the Command Line Runner, you create a class that implements the `CommandLineRunner` interface, which defines a single method called `run`. This `run` method is where you place the code that you want to run when the Spring Boot application starts.


   import org.springframework.boot.CommandLineRunner;
   import org.springframework.stereotype.Component;

   @Component
   public class MyCommandLineRunner implements CommandLineRunner {
       @Override
       public void run(String... args) throws Exception {
           // Your initialization or startup code goes here
           System.out.println("Application started. Running command line tasks...");
       }
   }


2. **Spring Component Scanning:**
By annotating your class with `@Component` or a related stereotype annotation (such as `@Service` or `@Repository`), Spring Boot will automatically detect and register it as a bean in the Spring application context during component scanning.

3. **Execution on Application Startup:**
When your Spring Boot application starts, Spring Boot will execute the `run` method of all the beans that implement `CommandLineRunner`. This happens after the Spring application context is fully initialized, making it suitable for tasks like database initialization, setting up default configurations, or running any custom logic needed at startup.

You can also access the command-line arguments passed to your application as `args` in the `run` method, which can be useful for customizing the behavior based on command-line input.

By using the Command Line Runner interface, you can easily add custom startup logic to your Spring Boot application without having to rely on external scripts or manual intervention, making your application more self-contained and maintainable.

The Command-Line Runner is an interface used to execute code after a Spring Boot application has started. Here's how you can implement the Command-Line Runner interface in your main class:


                    package com.techieuncle.app;

                    import org.springframework.boot.CommandLineRunner;
                    import org.springframework.boot.SpringApplication;
                    import org.springframework.boot.autoconfigure.SpringBootApplication;

                    @SpringBootApplication
                    public class ExampleApplication implements CommandLineRunner {
                       public static void main(String[] args) {
                          SpringApplication.run(ExampleApplication.class, args);
                       }
                       @Override
                       public void run(String... arg0) throws Exception {
                          System.out.println("Let's Print Hello World in Command Line Runner");
                       }
                    }                  


Beans and Dependency Injection in Spring Boot

What is Beans and Dependency Injection in Spring Boot

What is Beans and Dependency Injection in Spring Boot

In the ever-evolving landscape of software development, Spring Boot has emerged as a prominent framework for building Java-based applications. It offers a streamlined and efficient way to create robust and scalable applications. Two fundamental concepts at the core of Spring Boot's architecture are "Beans" and "Dependency Injection." In this article, we will delve deep into these concepts, exploring what they are, how they work, and why they are crucial in Spring Boot development.

Table of Contents

  1. Introduction to Spring Boot
  2. Understanding Beans
    • What are Beans?
    • Why are Beans Important?
    • Creating Beans in Spring Boot
  3. The Essence of Dependency Injection
    • What is Dependency Injection?
    • Types of Dependency Injection
    • How Spring Boot Implements Dependency Injection
  4. Benefits of Using Dependency Injection
  5. Spring Boot's Dependency Injection in Action
    • Constructor Injection
    • Setter Injection
    • Field Injection
  6. Managing Beans and Their Scopes
    • Singleton Scope
    • Prototype Scope
    • Request and Session Scopes
  7. Resolving Dependencies
    • Autowiring
    • Qualifiers
  8. Best Practices for Bean and Dependency Injection
  9. Common Pitfalls to Avoid
  10. Real-World Examples
  11. Integrating Beans and Dependency Injection into a Spring Boot Application
  12. Performance Considerations
  13. Evolving Your Spring Boot Application
  14. Future Trends and Developments
  15. Conclusion

1. Introduction to Spring Boot

Spring Boot is a Java-based framework that simplifies the process of building production-ready applications. It provides pre-configured templates and conventions for application development, reducing the need for extensive boilerplate code. At the heart of Spring Boot lies the concept of "Beans" and "Dependency Injection," which make it easier to manage and scale your application components.

2. Understanding Beans

2.1. What are Beans?

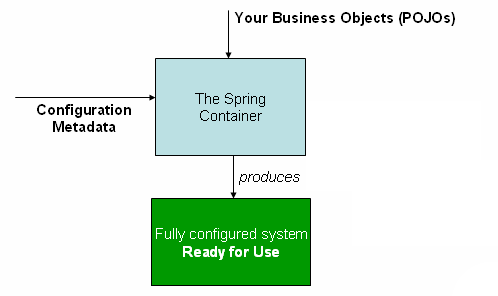
In Spring Boot, a "Bean" is a managed object within the application context. These objects are created, assembled, and managed by the Spring IoC (Inversion of Control) container. Beans represent the various components of your application, such as services, repositories, controllers, and more.

2.2. Why are Beans Important?

Beans are vital because they promote modularity and reusability in your code. By defining your application's components as beans, you can easily wire them together and manage their lifecycle. This decoupling of components simplifies testing, maintenance, and future updates.

2.3. Creating Beans in Spring Boot

Creating a bean in Spring Boot is straightforward. You can use annotations like @Component, @Service, or @Repository to mark a class as a bean. The Spring IoC container takes care of instantiating and configuring these beans, making them available for dependency injection.

3. The Essence of Dependency Injection

3.1. What is Dependency Injection?

Dependency Injection (DI) is a design pattern used in Spring Boot to achieve loose coupling between classes. It involves injecting the required dependencies (usually beans) into a class rather than having the class create them itself. This approach promotes code reusability and testability.

3.2. Types of Dependency Injection

In Spring Boot, there are three primary ways to perform dependency injection:

  • Constructor Injection: Dependencies are injected through the constructor of a class.
  • Setter Injection: Dependencies are injected using setter methods.
  • Field Injection: Dependencies are injected directly into fields of a class.

3.3. How Spring Boot Implements Dependency Injection

Spring Boot uses its IoC container to manage and inject dependencies. By annotating the fields, constructors, or setter methods with @Autowired, you can indicate where Spring should inject the required dependencies.

4. Benefits of Using Dependency Injection

Dependency Injection offers several advantages:

  • Flexibility: You can easily replace or update dependencies without altering the class using them.
  • Testability: It simplifies unit testing by allowing you to provide mock dependencies.
  • Maintainability: Code becomes more modular and easier to maintain.
  • Scalability: As your application grows, managing dependencies becomes more manageable.

5. Spring Boot's Dependency Injection in Action

5.1. Constructor Injection

Constructor injection is considered a best practice in Spring Boot. It ensures that all required dependencies are provided when an object is created.

5.2. Setter Injection

Setter injection allows you to set dependencies after object creation. It offers flexibility but can lead to instances with incomplete dependencies if not used carefully.

5.3. Field Injection

Field injection injects dependencies directly into class fields. While convenient, it can make it harder to identify a class's dependencies at a glance.

6. Managing Beans and Their Scopes

6.1. Singleton Scope

By default, Spring Boot beans are singletons, meaning there is only one instance of a bean per application context.

6.2. Prototype Scope

Beans with prototype scope are created each time they are requested. This is useful for stateful components.

6.3. Request and Session Scopes

In web applications, you can use request and session scopes to manage beans specific to HTTP requests and sessions.

7. Resolving Dependencies

7.1. Autowiring

Autowiring in Spring Boot automatically resolves dependencies by type. It simplifies configuration but may lead to ambiguity in complex scenarios.

7.2. Qualifiers

Qualifiers help disambiguate when multiple beans of the same type exist, allowing you to specify which one to inject.

8. Best Practices for Bean and Dependency Injection

To ensure clean and maintainable code, adhere to best practices like using constructor injection, providing clear bean names, and using qualifiers when necessary.

9. Common Pitfalls to Avoid

Avoid common pitfalls such as circular dependencies and overusing field injection to maintain the integrity of your Spring Boot application.

10. Real-World Examples

Explore real-world examples of how Beans and Dependency Injection are used in Spring Boot applications.

11. Integrating Beans and Dependency Injection into a Spring Boot Application

Learn how to integrate these concepts into your Spring Boot project, allowing you to harness their full potential.

12. Performance Considerations

Consider the performance implications of Beans and Dependency Injection in your application and optimize where necessary.

13. Evolving Your Spring Boot Application

As your application evolves, adapt your Bean and Dependency Injection strategies to meet changing requirements.

14. Future Trends and Developments

Stay informed about emerging trends and developments related to Spring Boot and dependency management in Java.

Beans and Dependency Injection in Spring Boot

Let's understand first here that what is a bean in spring and how did we use the IOC in spring framework?

What is Beans in Spring?

  • The objects that form the backbone of your application

  • The objects that are managed by the Spring IoC container are called beans.

  • A bean is an object that is instantiated, assembled, and otherwise managed by a Spring IoC container.

  • A bean is simply one of many objects in your application.

Let's see in the application, how beans get initialized for spring application:

Beans in Spring Boot

  • The @ComponentScan annotation is used to find beans in spring framework.

  • These beans are being injected with @Autowired annotation.

  • But, there is no need to specify any arguments for @ComponentScan annotation in the Spring Boot.

  • All component class files are registered with Spring Beans automatically.

This is very easy example to understand the auto-wiring the Rest Template object and creating a Bean for the same


              package com.techieuncle.app;
              import org.springframework.beans.factory.annotation.Autowired;
              import org.springframework.boot.SpringApplication;
              import org.springframework.boot.autoconfigure.SpringBootApplication;
              import org.springframework.context.annotation.Bean;
              import org.springframework.web.client.RestTemplate;

              @SpringBootApplication
              public class ExampleApplication {
              @Autowired
                 RestTemplate restTemplate;

                 public static void main(String[] args) {
                    SpringApplication.run(ExampleApplication.class, args);
                 }
                 @Bean
                 public RestTemplate findRestTemplate() {
                    return new RestTemplate();   
                 }
              }           


15. Conclusion

In conclusion, Beans and Dependency Injection are foundational concepts in Spring Boot development. They promote modular, maintainable, and scalable...

Add Controller in Spring Boot

how to add rest controller in spring boot?

How to add Rest Controller in Spring Boot?

In Spring Boot, you can add a controller by following these steps: Create a New Java Class: First, create a new Java class in your Spring Boot application. This class will serve as your controller. You can place it anywhere in your project's package structure, but it's a common practice to put it in a package named controller. Annotate the Class: Annotate the class with the @Controller annotation. This annotation tells Spring that this class is a controller and should be managed by the Spring container.


import org.springframework.stereotype.Controller;

@Controller
public class MyController {
    // Controller code goes here
}


Define Request Mapping: Inside your controller class, define methods to handle specific HTTP requests. Use the @RequestMapping or more specific annotations like @GetMapping, @PostMapping, @PutMapping, or @DeleteMapping to map these methods to specific URLs.


  import org.springframework.web.bind.annotation.GetMapping;

@Controller
public class MyController {
    
    @GetMapping("/hello")
    public String hello() {
        return "Hello, World!";
    }
}


In this example, the hello method is mapped to the /hello URL, and it returns "Hello, World!" when that URL is accessed via an HTTP GET request. Return Responses: Controller methods typically return a String representing a view name or use @ResponseBody to return data directly as JSON or other content types. In the example above, the method returns a String, which Spring Boot interprets as a view name, and Spring will attempt to find a matching view template. Configure View Resolver (if needed): If you are returning view names from your controller methods, you may need to configure a view resolver in your application.properties or application.yml file to map view names to actual view templates. For example, if you're using Thymeleaf as your template engine, you can configure it like this:


spring.thymeleaf.prefix=classpath:/templates/
spring.thymeleaf.suffix=.html


Run Your Application: Start your Spring Boot application. Spring Boot will automatically scan for your controller classes and set up the necessary mappings. Access Your Controller: Open a web browser or use a tool like curl or Postman to access the URLs mapped to your controller methods. In the example above, you can access the /hello URL to see the "Hello, World!" response.

Spring Boot Startup example:-


    import org.springframework.boot.SpringApplication;
    import org.springframework.boot.autoconfigure.SpringBootApplication;
    import org.springframework.web.bind.annotation.GetMapping;
    import org.springframework.web.bind.annotation.RestController;

    @SpringBootApplication
    @RestController
    public class MainClassForSpringBootApp {

        public static void main(String[] args) {
            SpringApplication.run(MainClassForSpringBootApp.class, args);
        }

        // creating an endpoint
        @GetMapping("/Hi")
        public String GreetingMsg() {
            return "Welcome to techieuncle.com";
        }

    }


Now run the main class and watch till the console as Tomcat started on port(s): 8080 (http) with context path ''
Now open chrome and test endpoint as http://localhost:8080/Hi
output will be Welcome to techieuncle.com
RestController provides rest api.


Spring Boot startup

How does Spring Boot startup?

How Does Spring Boot Startup?

Introduction

In the realm of Java development, Spring Boot has emerged as a game-changer. It simplifies the process of building robust, production-ready applications by providing a set of conventions and tools. But how exactly does Spring Boot start up and streamline the development process? In this article, we will delve into the intricate workings of Spring Boot, exploring its initialization, configuration, and the magic that happens behind the scenes.

Table of Contents

  1. The Foundation: Understanding Spring Framework
  2. The Spring Boot Difference
  3. The Start of Spring Boot
    1. Dependency Management
    2. Auto-Configuration
  4. The Application Properties
    1. application.properties
    2. application.yml
  5. The Component Scan
  6. The Embedded Web Server
    1. Tomcat
    2. Jetty
  7. The Spring Boot Application Class
  8. The SpringApplication.run() Method
  9. The Banner
  10. The Spring Boot Actuator
  11. The Customization
  12. The Magic of Annotations
    1. @SpringBootApplication
    2. @RestController
    3. @Autowired
    4. @RequestMapping
  13. External Configuration
  14. The Profiles
  15. Conclusion
  16. FAQs
    1. FAQ 1: Is Spring Boot suitable for all types of applications?
    2. FAQ 2: Can I use a different embedded web server instead of Tomcat or Jetty?
    3. FAQ 3: How can I override Spring Boot's default configurations?
    4. FAQ 4: What is the advantage of using profiles in Spring Boot?
    5. FAQ 5: Where can I learn more about Spring Boot?

1. The Foundation: Understanding Spring Framework

Before diving into Spring Boot, let's grasp the essence of its predecessor, the Spring Framework. Spring is a powerful framework that simplifies Java application development by providing solutions for various infrastructure concerns like database access, security, and more. It's known for its Inversion of Control (IoC) container, which manages the application's components.


1. The Foundation: Understanding Spring Framework Before diving into Spring Boot, let's grasp the essence of its predecessor, the Spring Framework. Spring is a powerful framework that simplifies Java application development by providing solutions for various infrastructure concerns like database access, security, and more. It's known for its Inversion of Control (IoC) container, which manages the application's components.

2. The Spring Boot Difference Spring Boot builds upon the Spring Framework but takes a different approach. It aims to make development faster and more accessible by offering pre-built configurations and sensible defaults. This means developers can focus on writing code rather than spending time configuring the application.

3. The Start of Spring Boot 3.1. Dependency Management One of the key elements of Spring Boot is its dependency management. It utilizes Maven or Gradle to handle project dependencies. Developers specify dependencies in a build file, and Spring Boot takes care of the rest, ensuring that all required libraries are included.

3.2. Auto-Configuration Spring Boot employs auto-configuration, a powerful feature that automatically configures application components based on the dependencies present in the project. This eliminates the need for extensive manual configuration.

4. The Application Properties Spring Boot allows developers to configure applications using properties files, namely application.properties and application.yml. These files hold configuration settings that can be easily modified without altering the code.

4.1. application.properties This file uses a simple key-value pair format, making it easy to set properties such as database URLs, server ports, and logging levels.

4.2. application.yml For more complex configurations, developers can use YAML format in the application.yml file, providing a more human-readable option for configuration.

5. The Component Scan Spring Boot performs a component scan to locate and register beans within the application context. This is crucial for discovering classes annotated with @Controller, @Service, @Repository, and others.

6. The Embedded Web Server Spring Boot eliminates the need for external web servers by providing embedded servers like Tomcat and Jetty.

6.1. Tomcat Tomcat is the default embedded web server in Spring Boot. It simplifies the deployment of web applications and allows for easy customization.

6.2. Jetty Jetty is another embedded server option, known for its lightweight nature and excellent performance.

7. The Spring Boot Application Class Every Spring Boot application starts with a main class annotated with @SpringBootApplication. This annotation combines three other annotations: @Configuration, @ComponentScan, and @EnableAutoConfiguration.

8. The SpringApplication.run() Method The SpringApplication.run() method is the entry point of a Spring Boot application. It initializes the application context, applies auto-configuration, and starts the embedded web server.

9. The Banner Spring Boot allows customization of the application's banner, which is displayed on startup. This can be a fun way to add a personal touch to your application.

10. The Spring Boot Actuator The Spring Boot Actuator provides a set of production-ready features, including monitoring and managing the application. It offers insights into the application's health, metrics, and more.

11. The Customization Spring Boot is highly customizable. Developers can override auto-configurations, modify property values, and even create their own auto-configuration classes.

12. The Magic of Annotations Annotations play a pivotal role in Spring Boot. Here are some commonly used annotations:

12.1. @SpringBootApplication This annotation combines various annotations to bootstrap a Spring Boot application.

12.2. @RestController Used to define RESTful web services.

12.3. @Autowired Injects dependencies into Spring components.

12.4. @RequestMapping Maps HTTP requests to specific methods in controllers.

13. External Configuration Spring Boot allows external configuration through property files, environment variables, and command-line arguments.

14. The Profiles Profiles enable developers to define multiple configurations and choose which one to use based on the environment, such as development, testing, or production.

15. Conclusion In conclusion, Spring Boot simplifies Java application development by providing a seamless and efficient startup process. It manages dependencies, auto-configures components, and allows for extensive customization. With Spring Boot, developers can focus on building applications rather than dealing with cumbersome configurations.

FAQs FAQ 1: Is Spring Boot suitable for all types of applications? Spring Boot is versatile and can be used for a wide range of applications, from simple REST APIs to complex microservices.

FAQ 2: Can I use a different embedded web server instead of Tomcat or Jetty? Yes, Spring Boot supports various embedded servers, and you can choose the one that best fits your needs.

FAQ 3: How can I override Spring Boot's default configurations? You can override default configurations by providing your own configuration classes or modifying the application properties.

FAQ 4: What is the advantage of using profiles in Spring Boot? Profiles allow you to create different configurations for various environments, making it easy to manage development, testing, and production settings.

FAQ 5: Where can I learn more about Spring Boot? To dive deeper into Spring Boot, you can explore the official documentation and various online tutorials.

In this article, we've unraveled the magic of Spring Boot's startup process. From dependency management to auto-configuration, Spring Boot empowers developers to create robust Java applications with ease. Whether you're a seasoned developer or just starting your journey in Java development, Spring Boot is a tool that can significantly simplify your work and boost your productivity. So, embrace Spring Boot and streamline your development process today!

15. Conclusion

In conclusion, Spring Boot simplifies Java application development by providing a seamless and efficient startup process. It manages dependencies, auto-configures components, and allows for extensive customization. With Spring Boot, developers can focus on building applications rather than dealing with cumbersome configurations.

FAQs

  1. FAQ 1: Is Spring Boot suitable for all types of applications?
  2. Spring Boot is versatile and can be used for a wide range of applications, from simple REST APIs to complex microservices.

In this article, we've unraveled the magic of Spring Boot's startup process. From dependency management to auto-configuration, Spring Boot empowers developers to create robust Java applications with ease. Whether you're a seasoned developer or just starting your journey in Java development, Spring Boot is a tool that can significantly simplify your work and boost your productivity. So, embrace Spring Boot and streamline your development process today!

How does Spring Boot startup?

In starting the spring boot, it setup default configuration, starts spring application context and perform class path scan as well as starts tomcat.
There is SpringApplication class that have static method run, which takes argument of main class from where application will start.

Spring Boot Startup example:-


              import org.springframework.boot.SpringApplication;
              import org.springframework.boot.autoconfigure.SpringBootApplication;
  
              @SpringBootApplication
              public class MainClassForSpringBootApp{
                
                  public static void main(String[] args) {
                  SpringApplication.run(MainClassForSpringBootApp.class, args);
                  }                
              }


What is Concept behind the starting Spring Boot?

Setup default configuration: Spring Boot starts with @SpringBootApplication in the public class mainclass and configure to bootstrap the application.

Starts spring application context:There is a main method in main class, from where our application will start and so that we have SpringApplication.run(MainClassForSpringBootApp.class, args); tha will return and will provide the ApplicationContext Object.

Perform class path scan:@SpringBootApplication annotation use to scan the full package while startup the application and check beans, controller and other coding stuff.

Starts tomcat:Spring Boot provides embedded tomcat to the application and developer should not worry about configuring the server.


Now, we are able to say that there is very good and better concept in Spring Boot while startup as below:-

  • Setup default configuration

  • Starts spring application context.

  • Perform class path scan.

  • Starts tomcat.


Thanks Reader...


Spring Boot Annotations

spring boot annotations

Spring Boot Annotations: Unveiling the Power of Metadata in Your Java Applications

Table of Contents

  1. Introduction
  2. Understanding Annotations
  3. The Magic of Spring Boot
  4. Commonly Used Spring Boot Annotations
    1. @SpringBootApplication
    2. @RestController
    3. @Autowired
    4. @RequestMapping
    5. @Service and @Component
  5. Custom Annotations in Spring Boot
  6. How Annotations Simplify Configuration
  7. Benefits of Using Annotations in Spring Boot
  8. Best Practices for Utilizing Spring Boot Annotations
  9. Annotating Your Way to Success
  10. Conclusion
  11. FAQs

1. Introduction

Java development can be a complex journey, with countless configurations and boilerplate code to manage. Spring Boot, a part of the larger Spring Framework ecosystem, aims to simplify this process, allowing developers to focus on writing business logic instead of getting bogged down in setup.

2. Understanding Annotations

Annotations, in the context of Java, are markers that provide metadata about code. Spring Boot harnesses this metadata to make various decisions at runtime, reducing the need for extensive configuration files.

3. The Magic of Spring Boot

Spring Boot is known for its "convention over configuration" approach. It relies heavily on sensible defaults and cleverly leverages annotations to minimize the amount of configuration a developer needs to do.

4. Commonly Used Spring Boot Annotations

4.1. @SpringBootApplication

This annotation marks the entry point of a Spring Boot application. It combines three other annotations: @Configuration, @EnableAutoConfiguration, and @ComponentScan, simplifying the setup of your application.

5. Custom Annotations in Spring Boot

Spring Boot allows you to create your own custom annotations, which can simplify and standardize your application-specific logic.

10. Conclusion

Spring Boot annotations have revolutionized Java development by simplifying configuration and making code more readable. By harnessing the power of metadata, developers can build robust and scalable applications faster and with less effort.

11. FAQs

Q1: Can I create my own custom annotations in Spring Boot?
Absolutely! Spring Boot encourages the creation of custom annotations to streamline application-specific logic.

Spring Boot Annotations

Spring Boot Annotations is gives metadata of program for certain action. In other words, annotations are used to provide additional actions in a program.

Core Spring

Core Spring Boot Annotations: Unraveling the Power of Spring Framework In the dynamic world of software development, efficiency and productivity are paramount. One of the tools that have gained immense popularity in recent years is Spring Boot. Spring Boot simplifies the process of building robust and scalable applications, and at its core are a set of powerful annotations that streamline development. In this article, we'll dive deep into the world of Core Spring Boot Annotations and explore how they can supercharge your development process. Table of Contents Introduction to Spring Boot Understanding Annotations in Spring Core Spring Boot Annotations 3.1 @SpringBootApplication 3.2 @RestController 3.3 @RequestMapping 3.4 @Autowired 3.5 @ComponentScan 3.6 @Service 3.7 @Repository 3.8 @Configuration 3.9 @Value 3.10 @Profile How Annotations Simplify Development Common Use Cases for Core Spring Boot Annotations Best Practices for Using Annotations Performance Optimization with Annotations Security Considerations Testing and Debugging with Annotations Troubleshooting Annotation-related Issues Future Trends in Spring Boot Annotations Conclusion Introduction to Spring Boot Before we delve into the world of Core Spring Boot Annotations, let's take a moment to understand what Spring Boot is all about. Spring Boot is an open-source Java-based framework that simplifies the development of production-ready applications. It builds upon the core Spring Framework while providing pre-configured templates and production-ready features out of the box. Understanding Annotations in Spring Annotations are a way to provide metadata about a program, and they play a crucial role in Spring Boot. They allow developers to configure and customize the behavior of Spring components. In the context of Spring Boot, annotations are like magic spells that empower your application with various functionalities. Core Spring Boot Annotations 1. @SpringBootApplication The heart of any Spring Boot application, this annotation marks the main class and triggers the auto-configuration process. It tells Spring Boot to start building the beans. 2. @RestController This annotation is used in a Spring MVC application to denote that the return type of the method should be bound to the web response body. It's the building block for RESTful web services. 3. @RequestMapping It maps HTTP requests to specific handler methods, allowing you to define how different URLs should be handled by your application. 4. @Autowired Dependency injection is a breeze with this annotation. It automatically wires up dependencies, reducing boilerplate code. 5. @ComponentScan This annotation specifies the base packages to scan for Spring components. It plays a pivotal role in component auto-detection. 6. @Service When applied to a class, it indicates that the class contains business logic. Spring treats it as a service bean. 7. @Repository This annotation marks a class as a data repository, which allows Spring to catch database-related exceptions. 8. @Configuration Used to denote a class as a source of bean definitions. It is often used in conjunction with @Bean to define beans explicitly. 9. @Value This annotation injects values from properties files directly into beans, reducing the need for property configuration. 10. @Profile With this annotation, you can specify which beans should be created based on the active profile. It's a handy tool for managing configurations in different environments. How Annotations Simplify Development Annotations in Spring Boot significantly reduce the amount of XML configuration required. This leads to cleaner and more maintainable code. Developers can focus on business logic rather than wrestling with complex configurations. Common Use Cases for Core Spring Boot Annotations @SpringBootApplication: Used in the main class to bootstrap the Spring Boot application. @RestController: Applied to controller classes to expose RESTful endpoints. @Autowired: Injecting dependencies without the need for manual wiring. @Value: Retrieving property values from external configuration files. @Profile: Configuring different beans for various environments. Best Practices for Using Annotations Use annotations sparingly, and only when they genuinely simplify the code. Keep annotations close to the elements they configure for better code readability. Document the purpose and usage of custom annotations in your project. Performance Optimization with Annotations Annotations, when used judiciously, can enhance the performance of your Spring Boot application. Avoid excessive annotation scanning by specifying base packages explicitly with @ComponentScan. Security Considerations Ensure that sensitive information like database credentials is not exposed in properties files when using annotations like @Value. Always follow security best practices. Testing and Debugging with Annotations Annotations make testing and debugging more manageable. Use @Profile to create separate profiles for testing and production environments, facilitating controlled testing. Troubleshooting Annotation-related Issues If you encounter issues related to annotations, check for conflicts or incorrect usage. Debugging tools like Spring Boot's Actuator can help identify problems. Future Trends in Spring Boot Annotations As Spring Boot evolves, we can expect to see more annotations and features that further simplify development, enhance security, and improve performance. Conclusion Core Spring Boot Annotations are the building blocks of efficient and productive Spring Boot development. By mastering these annotations, developers can harness the full power of Spring Boot to create robust and scalable applications. Embrace the simplicity and flexibility that annotations offer, and watch your development process soar to new heights. FAQs What is the primary advantage of using Spring Boot annotations? Spring Boot annotations simplify configuration and reduce the need for XML files, making development faster and more manageable. Can I create custom annotations in Spring Boot? Yes, you can create custom annotations to encapsulate specific configurations or behaviors in your application. How do I troubleshoot annotation-related issues in my Spring Boot project? Use debugging tools like Spring Boot's Actuator to identify problems. Double-check annotations for conflicts or incorrect usage. Are there any security considerations when using annotations like @Value? Yes, be cautious not to expose sensitive information like credentials in property files. Follow security best practices. What are the future trends in Spring Boot annotations? As Spring Boot evolves, we can expect more annotations and features aimed at simplifying development, enhancing security, and improving performance. @Bean - Spring IoC container manages each annotated method to produce a bean indivisually

Programmingshifts channel on youtube


OOPS Concept Link Language
java hello world https://youtu.be/4SY1jey-Ufc Hindi
Java Syntax understanding https://youtu.be/72066TLnExw Hindi
Create Object in java https://youtu.be/UaMhgydOCLU Hindi
What is Java Buzzwords/Java Features, JDK, JRE, JVM, Java Operators, Java Variables https://youtu.be/2HP7clR6GKY Hindi
Differences between static and non-static variables in Java https://youtu.be/rs-MnYZ83yY Hindi
Constructors in Java in 20 min - default and parameterized constructor in java https://youtu.be/LZvn4txnVJg Hindi
OOPS Concept Part 2- Inheritance in Java https://youtu.be/-vGCDjmurBs Hindi
OOPS Concept Part 1-What is Object, Class and Inheritance in Java https://youtu.be/Ols_ev_41kA Hindi
Abstract Class and Interface in Java https://youtu.be/TqPP3xfApUk Hindi
What is Abstract Class and Interface in Java? https://youtu.be/F211GLYBo7Y Hindi
Polymorphism in Java, Method overloading & Overriding with coding in 30 minute https://youtu.be/s4q6PCrIsUI Hindi
Difference between abstract class and Interface in Java https://youtu.be/wHkyMrxXCh4 Hindi
Control Statement part 1( Introduction of Control Statement: if statement) https://youtu.be/h8qoFgi1oIg Hindi
Control Statement Part 2: If-else statement, switch case, for loop, while loop, do while loop https://youtu.be/kgre9aLROkE Hindi
While Loop VS Do While Loop in Java https://youtu.be/TqPP3xfApUk Hindi
Continue Keyword in java https://youtu.be/OMMFO_AQo60 Hindi
Java Packages &  Array  
What is package in java? https://youtu.be/0r6760LWxrU Hindi
What are Packages in Java ? and What is 1D Array in java https://youtu.be/WKU80ONVC7Q Hindi
char array using concept of 1 D array https://youtu.be/GtL52Akge40 Hindi
String Handling  
String Handling in Java https://youtu.be/2CH5jcpBkg0 Hindi
Exception Handling  
Exception Handling in java https://youtu.be/RaeWpZ-veUU Hindi
What is Exception in Java? What is try-catch block in java? https://youtu.be/ZeIIosx7XDw Hindi
Check Exception VS Unchecked Exception in Java https://youtu.be/vYvRn15nozg Hindi
Multithreading Coding Classes  
Multithreading in java https://youtu.be/vJh7C89juwM Hindi
How to create thread in java https://youtu.be/vJh7C89juwM Hindi
What is runtime stack in Java? https://youtu.be/zfzu4zyZgZo Hindi
Sleep Method in Java ? https://youtu.be/Jubl_OHC-pk English
What is Java Lock? Or Synchronization https://youtu.be/fQV_ESflm0Q English
What is Thread Group in Java? https://youtu.be/44Cncbhs2Hg English
Collection Coding classes  
Collection Framework in Java Part 1 https://youtu.be/Z0kbM-hCe8w Hindi
Collection Framework in Java Part 2 https://youtu.be/d4Hs4HS8Cak Hindi
Java Socket Programming/Java Networking  
How to Read/Write both-side in Server & Client continuously in Java Socket Programming? https://youtu.be/c_UOJC25Jhs Hindi
How to communicate between Server & Client in Java Socket Programming https://youtu.be/DsQQNV_MCA0 Hindi
Socket Programming in Java, Socket, Server, client and Java Implementation https://youtu.be/Kk9n-tFLeBI Hindi
What is Socket Programming in Java & Java Networking https://youtu.be/0TU7QCXyVfw Hindi
RDBMS & MSQL  
Foreign key + Join tables in MYSQL https://youtu.be/rpzIwaaerak Hindi
primary key in mysql https://youtu.be/pjd78FqAH7c Hindi
Unique key in mysql https://youtu.be/tSwss-GDJ5U Hindi
MYSQL in 10 Minutes-User Management, Grants Privileges, Database Management, Tables & its Record https://youtu.be/mf3XTrGD5ns Hindi
JDBC  
JDBC in 60 min https://youtu.be/P6YtuXOYX3A Hindi
SWING  
Simple Calculator using Swing in Java https://youtu.be/TRYNAYMiO2A Hindi
JAVA IQ  
java interview preparation part 1 https://youtu.be/rkViSqMXtig Hindi
java interview preparation-part2 https://youtu.be/ONxN9AmS7j0 Hindi
   
Web Application in Java(Servlet & JSP)  
First MVC program in servlet and jsp https://youtu.be/ROnpYctkVIA Hindi
Crud Operation in Bluemix using Java Servlet and Mysql https://youtu.be/G2OlNHXQtMU Hindi
Bluemix jdbc with ClearDB Managed MySQL Database and servlet https://youtu.be/TBe1PflxXWM Hindi
Email Sending part 1 https://youtu.be/U6pXp5WPv8c Hindi
Email Sending part 2 https://youtu.be/TnHhUa-Eozc Hindi
Java Spring Framework  
Dependency Injection with Factory Method in Spring Part 2 https://youtu.be/4bSNcwiKKCs English
Dependency Injection with Factory Method in Spring Part 1 https://youtu.be/AeQfCMTg13U English
Autowiring in Spring-ByName Example with Coding in eclipse https://youtu.be/ZpElGcN8IN4 English
Autowiring in Spring https://youtu.be/pvGYOo-urJM English
What is the Dependency Injection in Spring? https://youtu.be/AAFRRq7-4HY English
Inversion Of Control: IOC BeanFactory Container & ApplicationContext IOC Container example with code https://youtu.be/ke7Yvf4AkQU English
Java Spring Framework Lecture 1 https://youtu.be/yA1q6ggt08E English
Difference Between BeanFactory and ApplicationContext IOC Containers Part 2 https://youtu.be/BI7qU17afi0 English
Difference Between Beanfactory and Applicationcontext in Spring Framework Part 1 https://youtu.be/Umvv5GXLFu4 English
IOC Containers in Spring Framework, BeanFactory IOC Container And ApplicationContext IOC Container https://youtu.be/ZOk5VM-BweI English
Many-To-Many Relationship in JPA https://youtu.be/IGlTMzJO5Gc English
One to One Mapping & cascade type all in Spring Boot JPA https://youtu.be/FmZNZ4hAl3U English
Java Spring Boot and React Application part-1 https://youtu.be/iZZUfUP7YJo English
Java Spring Boot and React Application part-2 https://youtu.be/jztT2ZK4tfs English
E commerce Project Development in Java Spring MVC with Hibernate using H2 Database https://youtu.be/bSht476C9Fo English


LEARN TUTORIALS

.

.